
Hopefully you’ve read my last post detailing How I’m learning to code. In that post I explain that I’ll show you how to build your first c# application to solve a real world problem. This article is going to do just that. Please bear in mind that this was also my first attempt at building something. So I’m not claiming it’s written with best practice or anything like that. It was my first working C# programme and it’ll be yours too.
Before you begin, you’ll need at least a couple of weeks experience with C#. If you don’t have that, re-read my How I’m learning to code blog and go out there and learn the basics.
The problem
A client who’s website I manage was running a competition. The competition terms stated that the winner would be selected at random. Now, I could have easily just used an online tool for this but I’ve been looking for real world project ideas for such a long time, this would be to easy to pass up the perfect opportunity to write some code in anger! At the start I was overthinking how to create the application and wanted to run before I could walk. The idea had great potential and I had visions of a fully fledged C# MVC website that would allow the user to run the competition and pick the winner. I had to slow down!
I settled on a simple console C# Application.
The Solution
Step 1 was to figure out my requirements. My requirements look like this:
– Take a collection of names and email addresses.
– Display one at random in the console window.
Step 2
Step 2 was to plan how the application would work and then work out where to start. I knew I’d have a list of names and e-mail addresses that I’d need my application to be able to access. Initially, I thought about adding them into a list of strings, this was a bad idea as I had around 160 entries so it would make the code look really messy. I decided I’d add them all into an XML file and then loop through that XML file to display a random name & e-mail address on the console. That sounds simple right? Not really, I had no idea how to do that as I hadn’t covered that in the learning that I’d already done.
Stackoverflow to the rescue! Don’t be afraid to google it if you are stuck. Being able to search for what you need is a skill in it’s self. The information I obtained form Stackoverflow was really helpful. I found a class called XMLReader. XMLReader allows you to move through XML data and read the contents. This is exactly what I was looking for. To make this tutorial I revisited the process, so I could capture some screen shots and show you how to build this application from the beginning.
How to build your first c# application
If you already have Visual Studio you can skip this step.
Download Visual Studio and follow the installer, if you don’t have a subscription you can download Visual Studio Community edition. After it’s installed you can go ahead and create a new project.
To create a new project go to File > New > Project

On the left hand side it will show you which templates you have to choose from. Select Installed > Templates > Visual C#. Next, in the middle section you can click ‘Console Application’
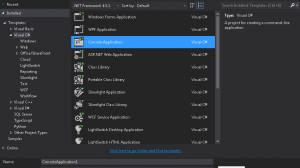
Give your project a name and select ‘OK’. When Visual Studio has finished setting up the project you’ll be greeted by an almost empty Program.cs file. It contains the bare-bones of an application such as the using statements, namespace , class and the main method. The main method is the entry point of the programme, it is here that the programme starts to execute.

Now we have our empty project we need to add some more using statements. This ensures we have access to some all of the classes we will be using in our programme. Go ahead and add the following using statements:
System.IO;
System.Threading;
System.Xml;
System.Xml.Linq;

After we’ve added the using statements we can create the XML file and begin to populate it with your entrants data.
How to add xml file to C# project
To add the XML file, on the right hand side of visual studio, right click on your project name and select Add > New Item.

It’ll open up a window to select an item. Scroll down until you see XML File, give your a file a name and select Add.

Once the XML file has been added to your project, it will need the XML document nodes adding to it. You’ll need to make sure you have a parent – child relationship with the XML nodes. I’ll show you what I mean below.
Set your XML file to the following format:
<?xml version="1.0" encoding="utf-8" ?>
<entrantDetails>
  <entrant>
  <name>Mr Test Tester</name>
  <email>test@test.com</email>
  </entrant>
  <entrant>
    <name>Mrs Test Tester</name>
    <email>test1@test.com</email>
  </entrant>
  <entrant>
    <name>Mr Test Tester</name>
    <email>test2@test.com</email>
  </entrant>
</entrantDetails>

Now we have the XML file in place and you have populated it with your entrant data, we can move on and write some code. We’ll start by writing the code that will access the XML File. I’ve also wrapped all of my code in a try catch block, this is so I can catch any exception errors and display an error message if somethings goes wrong.
We’ll create a new XDocument. The XDocument will represent our XML document. We won’t assign anything to our XDocument object just yet, we’ll do it later, so for now we can set it to null. The next statement in our code uses XMLReader. This is fairly obvious what it does. It’ll read our XML document we created earlier and load it into memory so we can then use another class to access it’s contents. Your code should look like this:

The next 4 lines of code will add some UI features and we’ll also access the names and email addresses into two variables called ‘name’ & ’email’. To make the programme seem to be loading the winner we can use a class called Thread. We can use Thread.Sleep to pause the thread that is currently executing giving it the appearance that it is loading. Next, I then created a variable called answerDelay, it’s a constant value and I’ve set that outside of the main method. It makes the code a little cleaner.
Console.WriteLine("Selecting Winner at Random, please wait...");
               Thread.Sleep(answerDelay);

               var name = xdoc.Descendants("name").Select(selectedName => selectedName.Value);
               var email = xdoc.Descendants("email").Select(selectedEmail => selectedEmail.Value);

You’ll see that the last lines of kind are also quite simple. Here we create two variables, randomNumber and selectedIndex. I assigned randomNumber to selectedIndex and gave each name a number and select one at random. Then I used string builder to put everything together and pass it to the console. It’s quite a simple programme but it works well.

I’d love to know if you have had a go at creating something similar. Leave a comment below. You can download this project source code in the downloads section.


Hi,
I get an exception error, can you help?